

This beaded charm bracelet is very easy to make, it takes a couple of hours depending on your skill with the pliers and how fat your fingers feel!!
You will need:
Tools
Pair of short nosed pliers
Pair of cutter pliers
 Findings etc
- Enough jewellery elastic to go round your wrist twice (or play it safe like I did and use 90cm)
- Approx 60cm of large link chain (I used 1cm) Tip: avoid chain with links that aren’t closed as it tends to come off the bracelet when the elastic is stretched…oops!)
- 8 x 14mm round or oval beads plus 1 focus bead (I used a silver coloured bead)
- 3 x smaller complimentary beads (I used 1 x 10mm and 2 x 6mm)
- Approx 11 charms and/or buttons
- 14 x 9mm jump rings
- 4 x calottes (Necklace Ends, also known as calottes or clamshells, are used to attach the necklace or bracelet thread~ we're going to use them to attach our ball chain to a jump ring. Calottes and bead tips are metal findings that cover the knot at the end of a string of beads. Calottes (also called clam shells) clamp sideways over the knot. Adding a drop of glue or clear nail polish secures the knot/chain. Close the bead tip with pliers.
- 4 x headpins (Headpins look like small thin nails. Put a bead on a head pin, bend a loop in the top, and you have a dangle! )
- approx 13mm of ball chain
- optional (but VERY handy) florist wire or beading needle


Calottes, headpins, jumprings and ball chain
Ok, lets get started.
Step 1

Thread the jewellery elastic through the chain, this is where a bent bit of florist's wire or a beading needle really helps.

Step 2
Your chain should now be 'scrunched' up along your threading material.

Now add your large beads.

Step 3
Open your jump rings by twisting them front to back, do not pull them apart as this pulls them out of shape, and pop them onto your charms and/or buttons


Step 4
You will need to thread the smaller remaining beads onto the head pins to make some dangle charms.

Step 5
Tie the loose ends of your threading material, adjusting for fit before cutting off the excess. Tip: try adding a drop of clear glue to the knot for extra security.

Step 6
Cut your ball chain into 3 different lengths.
Attach a calotte to each piece of chain securing with a small blob of clear glue if preferred.

Step 8
You are now ready to attach the charms/buttons, beads and chain to your bracelet, pausing to admire your handiwork at regular intervals!


Step 9
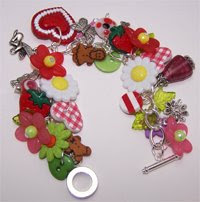
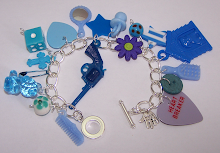
Ta da.... finished!

How smug do you feel now?


3 comments:
I stumbled upon your wonderful tutorial while researching for alternative uses of chain! I would love to introduce my readers to this how to in a future blog post. Okay? Pearl
http://www.beadinggem.com
I love it!!! Thank you so much for giving us a great idea!!
It is beautiful, I love it!! Thanks for the tutorial.
Post a Comment